Remembers window layouts per external monitor and restores position, size and Space (macOS 26) on reconnect, with DDC brightness keys on Apple Silicon.
English** · 简体中文 · 日本語 · 한국어 · Tiếng Việt Your windows go back where they were when you plug your external monitor back in, on the same desktop (Space) as before.**
LayoutKeeper is built on open-source principles to guarantee security, privacy, and full reproducibility. All sensitive data transformations run locally on your hardware with zero telemetry or unexpected cloud dependencies.
Key Technical Features & Capabilities
A layout per monitor. Each monitor is recognized by its hardware (EDID: maker, model, serial number). Your home and office monitors each get their own layout, with nothing to pick by hand.
Or one shared layout. If you only ever use one external monitor at a time, switch to "all external monitors share one layout". Office or home, you get the same desktops and windows. Positions are stored relative to the screen, so different resolutions still line up.: Streamlined desktop functionality optimized for macOS and Windows.
Puts windows back on the right desktop (macOS 26 or later). Windows that shared a desktop go back onto one desktop, in their original order, and two groups are never piled onto the same desktop. Older systems still get position and size restored on the current desktop.: Streamlined desktop functionality optimized for macOS and Windows.
Adds missing desktops for you (shared mode, on by default). When you plug in, it adds any missing desktops in Mission Control. It never deletes desktops. It stops and asks you to finish by hand if anything doesn't look right. No need to disable SIP.: Streamlined desktop functionality optimized for macOS and Windows.
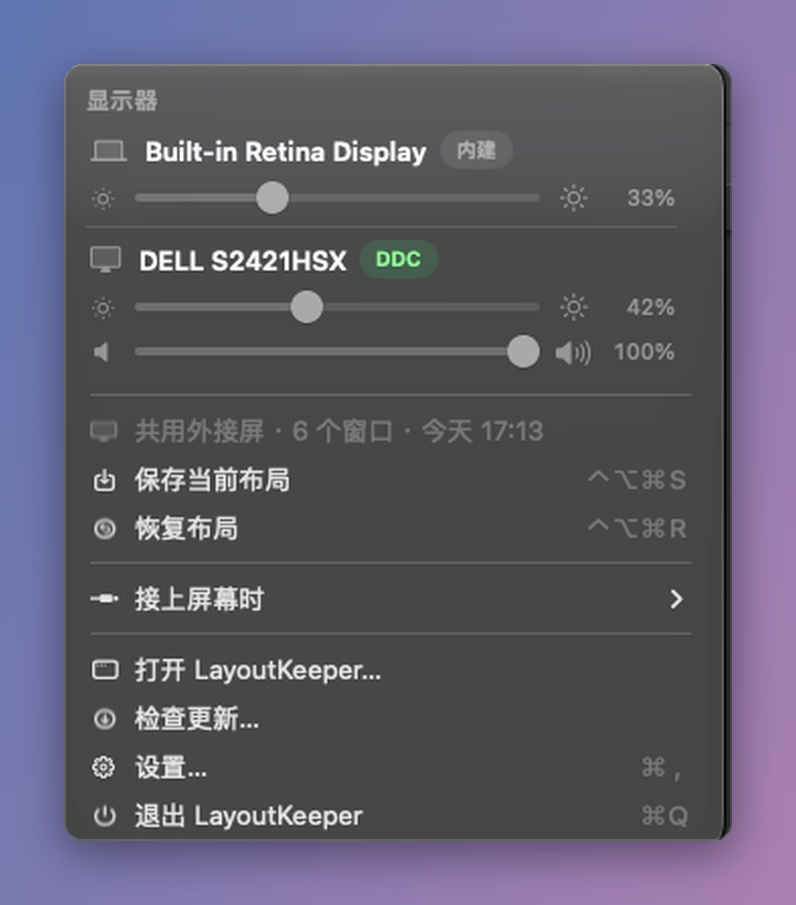
Brightness and volume keys for external monitors. The brightness keys adjust the screen your mouse is on, built-in or external, and show a translucent indicator at the top of the screen. You can also turn on Sync external brightness with built-in display so external monitors automatically change by the same amount when the MacBook's built-in screen adjusts to ambient light, while keeping each screen's relative brightness offset. The volume keys change your Mac's system volume (the current sound output) in 3% steps, wherever the mouse is. With Volume keys control the display's speakers when sound plays through it turned on in Settings → Displays → Keyboard (experimental, off by default), when sound plays through an external monitor's HDMI or DisplayPort audio and macOS can't change its volume, the volume and mute keys control that monitor's speakers over DDC instead. Hardware brightness control (DDC) works on Apple Silicon Macs only. If a monitor doesn't respond, LayoutKeeper falls back to software dimming. If BetterDisplay, MonitorControl or Lunar is running, LayoutKeeper leaves the keys alone.: Streamlined desktop functionality optimized for macOS and Windows.
Switch a monitor's input from the menu bar (experimental, off by default). After you turn it on in Settings → Displays → Menu Bar, Input Source in the menu sends the monitor a DDC input command (DisplayPort 1/2, HDMI 1/2 and USB-C by default). In Settings → Displays you can rename or hide inputs, enter the value from the monitor's manual, or use the LG alternate command. The first switch on each monitor asks for confirmation, and switching the Mac's only active screen always does. Many monitors stop taking commands from an inactive input, so you may need the monitor's own buttons to switch back.: Streamlined desktop functionality optimized for macOS and Windows.
Several named layouts per monitor, for example "Coding" and "Meeting". You can switch between them from the menu bar.: Streamlined desktop functionality optimized for macOS and Windows.
Version history. It keeps the last 5 versions of each monitor's layout, so you can go back.: Streamlined desktop functionality optimized for macOS and Windows.
Architecture & Technology Stack
Primary Languages: Swift
Frameworks & UI Runtime: SwiftUI / AppKit
Build Systems & Tooling: Xcode / Node.js / Cargo
Supported Platforms: macOS 12.0+ (Apple Silicon M1-M4 & Intel x86_64), Windows 10/11 x64, Linux
System Requirements
Specification
Minimum Requirement
Recommended Specification
Operating System
macOS 12.0 Monterey / Windows 10 x64
macOS 14.0+ Sonoma / Windows 11 x64
Processor Architecture
Apple Silicon (M1+) or Intel Core i5 x64
Apple Silicon Unified Memory (M2/M3/M4)
Memory (RAM)
4 GB Unified RAM
8 GB+ High-Speed RAM
Storage Space
300 MB available local disk space
1 GB+ SSD storage
GPU Acceleration
Metal 2 / DirectX 12 compatible
Apple Neural Engine / Vulkan capable
Installation & Setup Guide
macOS Installation (Recommended)
1
Download the verified .dmg release installer directly from CookApps.
2
Open the disk image and drag LayoutKeeper.app into your /Applications folder.
3
Launch LayoutKeeper via Spotlight (Cmd + Space) or Launchpad.
Alternatively, install using Homebrew if available:
bash
brew install --cask layoutkeeper
Windows Installation
1
Download the official installer package (.exe / .msi).
2
Run the executable and follow the setup wizard.
3
Launch LayoutKeeper from the Start Menu or desktop shortcut.
Building from Source (Development Setup)
bash
git clone https://github.com/tumingke0/LayoutKeeper.git
cd LayoutKeeper
pnpm install || cargo build --release
pnpm run build
How to Use & Workflow
1
Application Launch & Workspace: Open LayoutKeeper to load the responsive native workspace.
2
Configuration & Preferences: Press Cmd + , (macOS) or Ctrl + , (Windows) to configure hardware acceleration, custom directories, and display themes.
3
Primary Operation: Drag-and-drop source files or input parameters directly into the central window.
4
Execution & Export: Initiate the processing pipeline and verify output files saved directly to your chosen local directory.
Troubleshooting & Common Issues
Problem: macOS Gatekeeper displays *"App is damaged and can't be opened"* or unnotarized developer notice.
Root Cause: macOS quarantine flag set on binaries downloaded outside the Mac App Store.
Resolution: Open Terminal and run:
bash
xattr -cr /Applications/LayoutKeeper.app
Alternatively, navigate to System Settings > Privacy & Security and select Open Anyway.
Problem: High memory consumption during batch processing operations.
Root Cause: Large media buffers retaining uncompressed state.
Resolution: Adjust batch concurrency in settings or process assets in focused batches.
How to Use & Getting Started
## Installation & Setup Guide
### macOS Installation (Recommended)
1. Download the verified `.dmg` release installer directly from CookApps.
2. Open the disk image and drag **LayoutKeeper.app** into your `/Applications` folder.
3. Launch LayoutKeeper via Spotlight (`Cmd + Space`) or Launchpad.
Alternatively, install using Homebrew if available:
```bash
brew install --cask layoutkeeper
```
### Windows Installation
1. Download the official installer package (`.exe` / `.msi`).
2. Run the executable and follow the setup wizard.
3. Launch **LayoutKeeper** from the Start Menu or desktop shortcut.
### Building from Source (Development Setup)
```bash
git clone https://github.com/tumingke0/LayoutKeeper.git
cd LayoutKeeper
pnpm install || cargo build --release
pnpm run build
```
Ready to run LayoutKeeper?
100% Free & Open-Source native desktop software. Star the repository to support development.